Showing posts with label Fine Sanding. Show all posts

Saturday, May 17, 2025

Garage Works - 5/17/2025

This is the board Bill got to me today - cracks in the top of the rails - both sides


I grinded the cracked epoxy out and prepared it for a fill with strips of carbon


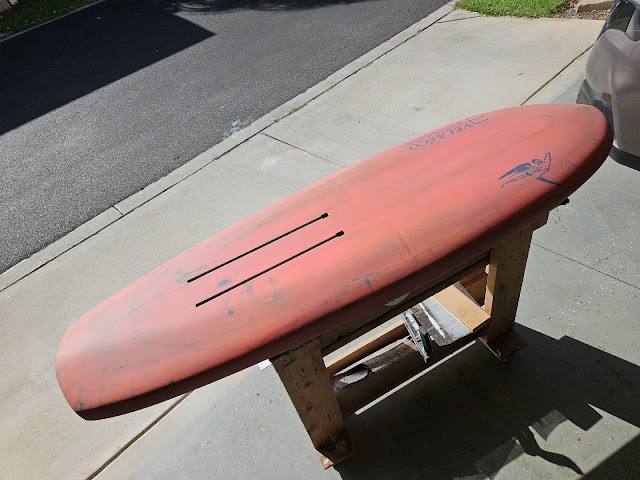
And I prepped the patches for the trench board


Got them placed and then headed out to run errands


I sanded the Portal and then sprayed some clear coat on and that one was done.

For the Cruzer, I sanded, placed a fill coat, allowed it to harden, then came in and sanded the excess off.


Not the best job I've done, but with the repair so close to the deck pads it was the best I could do (without damaging the pads).


I loaded those two boards in the truck so I can return them to Bill tomorrow - and then I had a big empty space in the garage...

Now I can work on No.41 again.  Since I had Bill's trench board (Amos Cruzer), I took some measurements from it and then marked up the cuts I'll need to make to get my version of a trench board put together.


Probably four extra steps needed to get the trench in place.


Here we go!

Monday, February 10, 2025

Garage Works - 2/10/2025

I decided to stay back from water time today so I could get No.40 across the finish line.

Here it is all sanded down to 400 grit.

Top deck -


Bottom deck (with the tracks opened up).


And just to provide those following - here is the primary difference between No.39 and No.40 - "V"

I wanted to compare the flat tail of No.39 to the "V" in No.34 - but the longer length in 34 didn't make the comparison on level terms.

Getting the bottom shape on this board was an exercise in joining different curves and making them work together.  The upcoming testing will determine if it is worth the extra effort over a flat bottom.


After sanding, I headed off to get some clear coat.  The shop only had one can - so here is the board sprayed up with one can.

I'll try and grab another can tomorrow to get another coat on the board (makes it more scratch resistant - and prettier).


There are other differences between 39 and 40 - 

40 is shorter by an inch,

But wider by an inch.

40 is also thicker by a smidgeon.

And 39 is more streamlined, where 40 has some hips to it (taking off with 39, I had to be further back on the board than I normally rode - 40 has more volume forward so taking off "should" be weight further forward).


The WMFG deck pad is still supposed to arrive by Thursday.  Which means this board would get wet on Saturday morning.

That also means I'll start Foil Drive-ing with No.39 now to start getting a feel for its performance characteristics, before switching off to No.40 this weekend.

Let the testing (riding) begin!!!!

I think the next board is going to be a 5'2" - bottom shape to be determined by the upcoming 39-40 testing.  The shorter length will be for the summer swells (since Marvin bought the last 5'-Oh that I built).


Saturday, February 1, 2025

Garage Works - 2/1/2025

Yesterday morning I got Scotty's barracuda back to him, so that meant the rack was open again.

When I got back I got to work on No.40

This board is going to be a shorter/wider version of No.34 - that board has proven itself to be incredibly versatile, so I wanted to make a version to compare against No.39 (which are the two shapes I've focusing on recently) 

I started by skinning the top and bottom and started bulk removal at the nose and tail.


The tail bulk removal is driven by the track placement.


After using the planer I shifted to the Surform, dragonskin and then sanding screen.

I got through the rough shaping pretty quick.

Here's the bottom


And here's the top


I left the board alone for a bit (did some other work) - but instead of not coming back to it for a day, I looked for the discrepancies and got to them with the surform and sanding block - so I ended up getting the secondary/fine shaping done also.

I then broke out No.39 and did some calculations on track placement based off of placement on that board.  I marked it out and then kept going.

Here is the slot all routed out.


And the track block dry fitted


This is just before I opened up the Gorilla Glue...


And here it is with the glue curing.


I don't think I've ever gotten a board through these stages this quickly before...

Now I feel compelled to see how fast I can get it laminated.

Sunday, November 17, 2024

Garage Works - 11/17/2024

I had a bunch of errands to run in between winging and getting home - haircuts and picking up stuff for La.  But once I got home, both Marlon and La had the garage clear.

I got through from the rough shaping to the fine sanding on No.39 this afternoon. 


And I even got the track block all measured out and ready to route


This is where I'll be placing the track block (which I'll try to get opened up tomorrow).


And after working on No.39, I got the excess epoxy off the repaired areas on Prayot's AFS Pure 900


The front edge repair needed additional epoxy to get filled properly.  And since I was working with epoxy anyways, I got the starboard wing tip all dressed up as well.


I should be able to fair this in tomorrow and then wetsand (and it could be done).

Tuesday, October 15, 2024

Garage Works - 10/15/2024

I worked in the garage before going winging - but I had those pictures uploaded first.

I got the clear coat on Norm's board - I'll let it harden overnight and tomorrow I'll get the deck pads on it.

Then I sanded and filled (and sanded) the repair on Kalani's board.


Filled and sanded more times than I thought it would take (all because I didn't use peel ply up front).


With this one cleared, I started the repair on Greg's beat up board.  I'd like to get that done before starting No.39 (thinner 5'8")


Monday, October 14, 2024

Garage Works - 10/13/2024

Yesterday I got to spend a lot of time in the garage.

First up was sanding No.38

And sanding.  And more sanding.  I got the board through 40-80-120-180-220-320 grits.

Then I went ahead and got the vent and leash plugs installed.  I played with some different foot pad configurations - gotta let those settle out (too many variations).


Then I worked on these two - Kalani's new to him Drifter 72 and No.33


After Kalani brought this board home, he found a soft spot.  I filled it with milled fibers/epoxy, placed a small patch over the open ding, then placed this bigger cap patch.  Today I'll sand off the excess, place a fill coat and this one should be good.


This toe bar had come loose on No.33

I used rubber cement and it's as good as new.

It's amazing what happens when you get used to something and then it suddenly isn't there - I use the tactile feedback to know my front foot is at the sweet spot.


Today I'll sand down the plugs on No.38, give it a wash down to get the sanding dust off and spray a wear coat on it.  No.38 is going to be wicked good!!!!

Thursday, October 10, 2024

Garage Works - 10/10/2024

Yesterday I spent some time in the garage getting this project further towards the finish line.

I sanded the excess fill coat epoxy and got it super close to the finish depth.

Here's the bottom deck-


And here's the top deck


Then I opened up the tracks and applied the bottom logos.


After getting some other errands done in the afternoon, I added another layer of clear epoxy to cover the logos and correct any low/high points.

Today I'll lightly sand the rails and the top deck over lay, place the top deck logo on and then add the top deck clear coat.

After that, tomorrow will be more sanding and the plug installations.

Most likely final fine sanding on Sunday, spraying an enamel/acrylic wear coat, then the deck pads.

Getting real close!!!!  

Sunday, June 30, 2024

No.37 All Pau

I had set foot in the garage to clean up a bit.  I was throwing the mixing cups away and noticed the epoxy was pretty darn hard.  I figured I could go ahead and sand the boards and be done with it.


After sanding I even went ahead and washed the sanding dust off the board.  Here's the top deck all done.  I need to still cut up the deck pad and get it applied (after I go to Napa and see if they have matte clear coat).  But this is essentially done.


Bottom deck all cleaned up also.


And here are the dimensions.


I lined this one up to No.33 to see where the differences lie - I pulled the tail in on this one and it's apparent.  Not so much to make the tail sink more - but enough to see what the change will actually do.  I will definitely get this anointed this week!!!

I also sanded the repair on No.19 and I'll bring it back to work tomorrow.

Garage Works - 6/30/2024

I got a lot done in the garage today.

First up was sanding No.37.  Here's the top deck all sanded.


And here's the bottom deck all sanded and the tracks routed out


And the vent and leash plugs installed (plus a little epoxy to add material to some thin spots).


I just need to sand down the plugs, clean up the new epoxy spots then spray clear coat.  I'm trying to work out the deck pad layout.  That's another couple of days of work (about two hours a day because of drying and adhesive sticking time).

I also broke out No.19 to get a repair that was sitting under duct tape fixed properly.  There's been a few people hinting at wanting to learn - I figure I can sell off my old stuff (GoFoil and Takuma, and the bigger Reedins) if I can get them through the learning curve.  And Nick uses this board when he comes to Oahu.

It just really needed a little sanding and a patch of 4 ounce fiberglass.


Then I addressed the multiple harnesses I have in the garage.  The wing harness has seen better days and I have a T9 that has just been sitting there - so I transferred all the modifications over from the T8 to the T9.

I also put the new kiting hook on the Pyro that I had sitting around.


These have been with me for a long time - letting go of things like this is like saying goodbye to an old friend.  Thanks for covering my ass for all these sessions -


Sunday, June 9, 2024

Garage Works - 6/9/2024

I've been enjoying naps in the afternoons this weekend - so I actually skipped out on foiling today (naps are also a cool activity that I thoroughly enjoy).

What I did instead was get a few projects moved forward.

This one was from yesterday evening - I got the new to me 90cm Project Cedrus Aluminum mast sealed up.  I used the JB Weld Marine Weld this time - mixes up nice and think to minimize running and the set up is conducive for that as well (5 minutes).

I'm looking forward to using this mast when Foil Drive-ing in bigger surf to keep the foil in better water (deeper to avoid the impacts).


Today I started work on the board (Uncle Joe's) I was asked to install mast tracks in.

I measured out where the centerline is and marked up the foam reinforcement blocks to the 90mm spacing.

Then I used the blocks to mark up the cut lines.  I hemmed and hawed but finally broke out the big router.  Cutting this slot out was a pain in the ass.  There were footstrap inserts and the SUP handle to cut through.  And then there was the tuttle box - royal pain in the ass.  But I did get through it all.

The next step was to place pour foam into the routed hole, but I'm going to have to use epoxy and fiberglass to cap the SUP handle and the tuttle screw holes first (I'll do this tomorrow). 


Not wanting No.37 to languish with all this other work going on, I got it through the 80 and 120 screen grit sanding.  This step is best to do in strong sunlight to see the lines and try to get everything lined up.


After that is when I took my nap and then made a run to Kaneohe to pick up Noe (who has been racing in the Summer Sailing Series).  After we got back, I wanted to get the router work with the straight bit done.  I asked Marlon to man the vacuum and we got the slot for No.37 routed out.


This is a really good (high tolerance cut) slot for the track block.


I am debating whether to use Gorilla Glue in one step, or to use two steps and epoxy a thin layer of fiberglass on the bottom, then epoxy in the block.  This track block is different than the 16" version I have been using - figured I give this brand a try (15" track).


I'm leaning towards the Gorilla Glue (non-expanding) option since the tolerance is tight on the cut - and there is zero chance for exotherm burns.