Showing posts with label foil board building. Show all posts

Monday, February 10, 2025

Garage Works - 2/10/2025

I decided to stay back from water time today so I could get No.40 across the finish line.

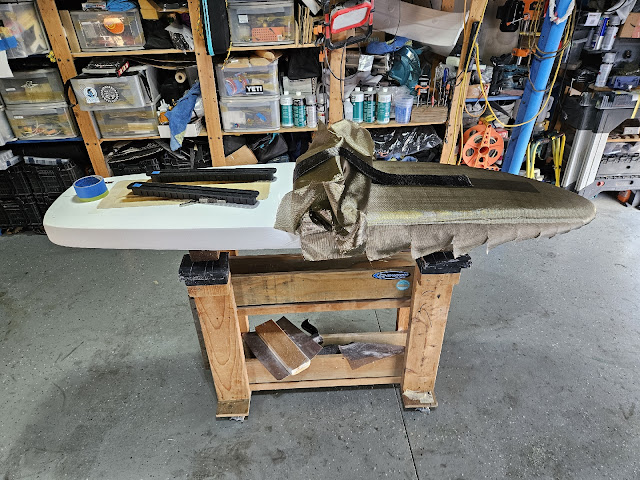
Here it is all sanded down to 400 grit.

Top deck -


Bottom deck (with the tracks opened up).
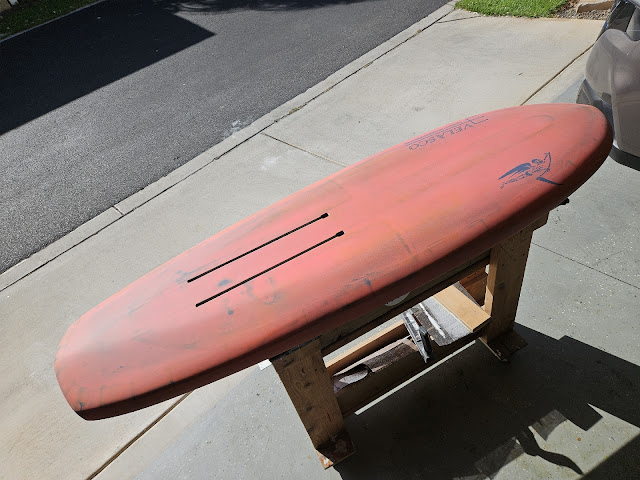

And just to provide those following - here is the primary difference between No.39 and No.40 - "V"

I wanted to compare the flat tail of No.39 to the "V" in No.34 - but the longer length in 34 didn't make the comparison on level terms.

Getting the bottom shape on this board was an exercise in joining different curves and making them work together.  The upcoming testing will determine if it is worth the extra effort over a flat bottom.


After sanding, I headed off to get some clear coat.  The shop only had one can - so here is the board sprayed up with one can.

I'll try and grab another can tomorrow to get another coat on the board (makes it more scratch resistant - and prettier).


There are other differences between 39 and 40 - 

40 is shorter by an inch,

But wider by an inch.

40 is also thicker by a smidgeon.

And 39 is more streamlined, where 40 has some hips to it (taking off with 39, I had to be further back on the board than I normally rode - 40 has more volume forward so taking off "should" be weight further forward).


The WMFG deck pad is still supposed to arrive by Thursday.  Which means this board would get wet on Saturday morning.

That also means I'll start Foil Drive-ing with No.39 now to start getting a feel for its performance characteristics, before switching off to No.40 this weekend.

Let the testing (riding) begin!!!!

I think the next board is going to be a 5'2" - bottom shape to be determined by the upcoming 39-40 testing.  The shorter length will be for the summer swells (since Marvin bought the last 5'-Oh that I built).


Wednesday, February 5, 2025

Garage Works - 2/5/2025

I got the fill coat of the top deck today.


This part of the build process just takes time.  I don't like to sand a coat unless 24 hours has passed - makes it much easier to sand and get good results.

And for this board, after I get this base fill coat sanded, I'll place the logos and do a last fill coat with the ProLink epoxy.  


I think this one will have more of the 'distressed carbon' look after sanding.


And to fill more of the lap gap and other low spots, I placed the drip tape further back.  As I am writing this, I've already pulled the tape and gotten the board settled in the garage for the night.

Tomorrow I'll get the board sanded, washed, the logos placed and maybe get the first Prolink coat on.

That will leave Friday for the Prolink coat on the opposite deck.

Saturday should see the tracks opened, and final sanding.

Saturday, February 1, 2025

Garage Works - 2/1/2025

Yesterday morning I got Scotty's barracuda back to him, so that meant the rack was open again.

When I got back I got to work on No.40

This board is going to be a shorter/wider version of No.34 - that board has proven itself to be incredibly versatile, so I wanted to make a version to compare against No.39 (which are the two shapes I've focusing on recently) 

I started by skinning the top and bottom and started bulk removal at the nose and tail.


The tail bulk removal is driven by the track placement.


After using the planer I shifted to the Surform, dragonskin and then sanding screen.

I got through the rough shaping pretty quick.

Here's the bottom


And here's the top


I left the board alone for a bit (did some other work) - but instead of not coming back to it for a day, I looked for the discrepancies and got to them with the surform and sanding block - so I ended up getting the secondary/fine shaping done also.

I then broke out No.39 and did some calculations on track placement based off of placement on that board.  I marked it out and then kept going.

Here is the slot all routed out.


And the track block dry fitted


This is just before I opened up the Gorilla Glue...


And here it is with the glue curing.


I don't think I've ever gotten a board through these stages this quickly before...

Now I feel compelled to see how fast I can get it laminated.

Tuesday, December 24, 2024

Garage Works - 12/24/2024

Here is the genesis of No.40

5'6" x 19.5"

This one is going to be a shorter version of No.34 - the board that has proven itself to be incredibly versatile.


You may take notice that No.39 is dimensionally similar - and in that you would be correct.  

Where No.39 was a variation of No.38 and No.37, No.40 will be have a similar bottom to No.34

Template wise, this board draws more from my earlier work - my first foil boards - I just shifted the templates a bit to get a shape with a little more volume in the front (to keep the wing foil starting point forward - which is something I learned from No.39 where more of the volume of the board is in the rear and to start I have to put more weight on the back).

At 19.5" width, this is still a relatively narrow board - so it should move through the water nicely.

On this build, I am also planning on using carbon strips to strengthen the spine/centerline of the board and have fiberglass be the main reinforcement.  This is a significant change to what I've been doing for quite some time.

This one will not have footstraps - at this length I don't think they are needed.  This will also save weight that can be redirected to more reinforcement fabric.

Another grand experiment!

Tuesday, December 10, 2024

Garage Works - 12/10/2024

And to keep progress going in the right direction, I drilled the holes for the plugs and got them epoxied into place this evening.


Leash plug - orange on orange.  I've never done that before.


And the vent plug is under the weight.  That's so it wouldn't float on top of the epoxy.


Tomorrow I should be able to sand the plugs down, then sand the entire board, and maybe even get the clear coat sprayed onto the board.

I've still got some sanding to do, but this board is going to end up being on the heavier side of the spectrum.  That is partly due to the footstrap inserts.  And it is also due to the multiple fill coats I put on the board.  But in the end this will be a strong board that will last a long time.

I do like the momentum the additional weight produces.

Watching the board emerge during these last few steps in a build are pretty exciting.

Saturday, November 30, 2024

Garage Works - 11/30/2024

I spent the evening getting the top deck laminated.

I sanded the inserts down and got rid of any burrs.

Then I sealed up the insert holes with surf wax.

Then I laid out patches where my heels and knees will go.

The cap sheet was falling short so I had to splice the last foot.  I opted to put the splice at the back since my foot will never go that far back.


And here is the board all laminated.  Whenever I place footstrap inserts in a board, I have to pay more attention to getting the laminate tight against the board/insert.


This effort this evening keeps me on schedule.  I'll likely sand laps tomorrow and get the first (of possibly four) fill coats on.  If I'm lucky, I could get the second coat on in the evening (just have to start earlier in the day).

I'm thinking with all the sanding, filling, sanding, filling, logos, filling, sanding and then spraying I'll have to do before I get the board outfitted, it'll be next weekend before I get this board anointed.

Thursday, November 28, 2024

Garage Works - Thanksgiving

I have a really long weekend - I managed to take Friday and Monday off.  And with that comes the opportunity to get significant headway on No.39

After we got back from La's cousin's house (Thanksgiving), I went ahead and got started on the next steps.


First off was trimming the basalt oversheet.  I also wanted to check if I have enough to laminate the top deck... not quite with a single sheet (I might still splice the overlay...).

Then trimming the lap and cutting the relief slits


To laminate the overlay, I initially used 13.3 ounces - then I added another 4.2 ounces to laminate the box cap sheet (way thicker longitudinal carbon)

This one came out tight!


I marked the t-nut hole in the cap sheet and added the remaining epoxy to the front and back edges of the cap sheet.


Tomorrow I'll start by sanding the laps, then I'll settle on the footstrap positions and route out the foot strap insert slots.

I'll glue the reinforcement blocks in place, wait for the glue to dry, then route out the foot strap insert holes.

I'd like to get the inserts epoxied in and then I'll work out the laminates.  Whether I laminate the top deck depends on what else I end up doing tomorrow (Foil Drive-ing on the dawn patrol, and if the wind comes up parawinging in the afternoon).

Worst case - I laminate Saturday morning.  If that's the case, I should be adding fill coats Saturday evening.  If I keep to this schedule, I should be riding this board (wing and Foil Drive) later next week.


Garage Works - 11/28/2024

Getting ready to laminate No.39


I'll get the bottom deck laminated this evening.

Monday, November 25, 2024

Garage Session - 11/25/2024

I already alluded to the work I got done with today - Roland's two boards.

After I got back from surfing - in preparation for laminating No.39, I went ahead and placed new tape on the shaping rack.


Now that I've clear the garage of the side projects, I'm going to focus on getting No.39 across the production finish line.

Starting Wednesday afternoon, I'll have 5 days straight where I can focus on this.  I'll need to laminate the bottom deck, then figure out where I want to place the foot strap inserts, get those cut and glued in, laminate the top deck, get the fill coats on, sand, fill, sand (and maybe fill, sand).

I need to get some more epoxy before Thanksgiving...

Sunday, November 17, 2024

Garage Works - 11/17/2024

I had a bunch of errands to run in between winging and getting home - haircuts and picking up stuff for La.  But once I got home, both Marlon and La had the garage clear.

I got through from the rough shaping to the fine sanding on No.39 this afternoon. 


And I even got the track block all measured out and ready to route


This is where I'll be placing the track block (which I'll try to get opened up tomorrow).


And after working on No.39, I got the excess epoxy off the repaired areas on Prayot's AFS Pure 900


The front edge repair needed additional epoxy to get filled properly.  And since I was working with epoxy anyways, I got the starboard wing tip all dressed up as well.


I should be able to fair this in tomorrow and then wetsand (and it could be done).

Monday, October 14, 2024

Garage Works - 10/13/2024

Yesterday I got to spend a lot of time in the garage.

First up was sanding No.38

And sanding.  And more sanding.  I got the board through 40-80-120-180-220-320 grits.

Then I went ahead and got the vent and leash plugs installed.  I played with some different foot pad configurations - gotta let those settle out (too many variations).


Then I worked on these two - Kalani's new to him Drifter 72 and No.33


After Kalani brought this board home, he found a soft spot.  I filled it with milled fibers/epoxy, placed a small patch over the open ding, then placed this bigger cap patch.  Today I'll sand off the excess, place a fill coat and this one should be good.


This toe bar had come loose on No.33

I used rubber cement and it's as good as new.

It's amazing what happens when you get used to something and then it suddenly isn't there - I use the tactile feedback to know my front foot is at the sweet spot.


Today I'll sand down the plugs on No.38, give it a wash down to get the sanding dust off and spray a wear coat on it.  No.38 is going to be wicked good!!!!

Sunday, September 29, 2024

Garage Works - 9/29/2024

La was helping out with some races at KYC - so I had time to get some work done on No.38

I started out fairing the track block and getting the boxes set in with epoxy.  And then I got the bottom deck laminates all trimmed.


There's a carbon spine on the blank, then the top to bottom basalt layer, and finally a carbon cap sheet over the block.


I used 21 ounces of epoxy for the bottom deck lamination.  And to make sure I didn't have any off gassing bubbles, I attended to the board while the epoxy was hardening.


After a few hours, I tested the lamination to see if I could sand it - yup!  So I went ahead and laminated the top deck.

Here's the top deck with the laps sanded down and the under layers staged.


And here is everything laminated.  I used 19 ounces for the top deck.


Nice and tight!!!!


I'll sand this again when I get home tomorrow and maybe get the first fill coat on (and if I get it on early enough, I can probably get the opposite side filled as well.  Norm wants this board all white - so that is a thicker fill coat (with white pigment).

Garage Works - 9/28/2024

After the race, I settled into the garage and got through cutting the track box hole.

First was marking the centerline.  I always do this at least twice (and most times I end up adjusting).


I also have to deliberate the actual foilblock position.  I used No.32 as a guide and did some calculations based on the overall length of each board.  I settled on 8.5" up from the tail - and this was where the calcs indicated placement, as well as the eyeball test.


All marked up.  Now it's time to make a huge mess.


And my OCD kicks in - frequent stops to vacuum up the cut foam...


And here it is all cut out.


I didn't take pictures, but I got the block glued in last night.

Tuesday, August 1, 2023

Garage Works - 8/1/2023

Since I couldn't go foiling today, I figured I should go full bore on No.32 and get this thing finished.

I had originally planned on just marking the locations of the footstrap inserts -


But I went ahead and routed out the slots.


Not bad spacing.  It's not so tight that I can't put a layer of fiberglass under the blocks, but not loose that it'll take a bunch of epoxy to fill.

Those of you with discerning eyes will have noticed the two extra blocks out towards the nose.  These are for mounting the Foil Drive battery box.


I even had enough sunlight to rout out the SUP handle.


Pretty amazing how much work can get done when I'm not out foiling ;)